
This article describes how to rig up a CentOS 7 virtual machine on a QNAP NAS equipped with Virtualization Station.
First off, make sure you have all the necessary elements installed into the administration environment, namely Container Station and Virtualization Station.
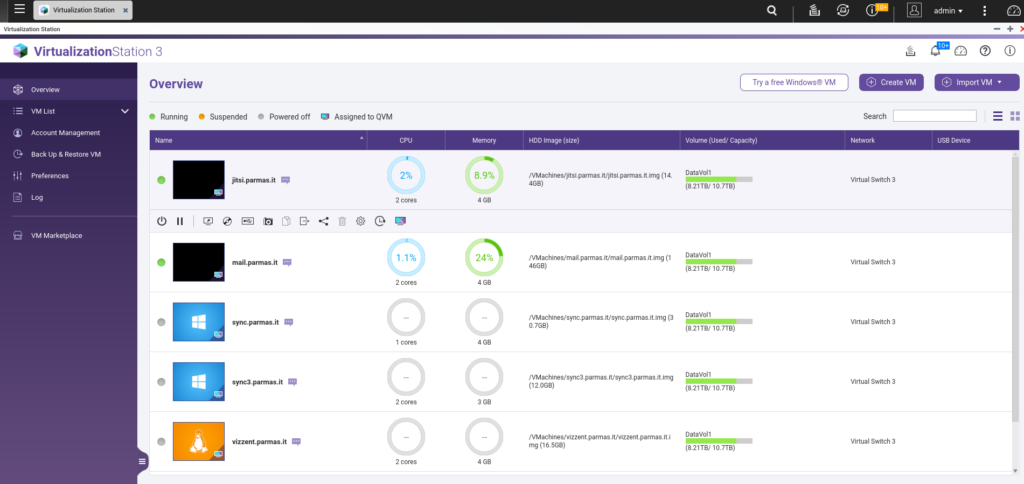
Here under you can find a screenshot taken from my administration page of my TS-453A.

Then get prepared downloading a CentOS installation image. You can choose among several versions, but I generally use the iso file containing the minimal version to be sure the server is the lightest possible. Then I install all I need manually on a case basis.
As you can see I will install a release 7 even if CentOS 8 is already downloadable. In case you want to install CentOS 8, just follow the same procedure, downloading the right version from here http://isoredirect.centos.org/centos/7/isos/x86_64/ .
Recently CentOS project team released a rolling release called Stream. I did not test yet but if you are planning to house Kolab Community Server as described in this<><> article, better you choose the mainstream version.
Step 1
Create a new virtual machine in Virtualization station as in the following picture pressing the button on the top right side of the overview page.
Step 2
Give the VM a name, a description and define the basic details as the number of cores, quantity of RAM granted to the machine, the type of BIOS (this is a nice recent feature that has been included into the most recent update of Virtualization Station) and the Virtual Switch to connect to.
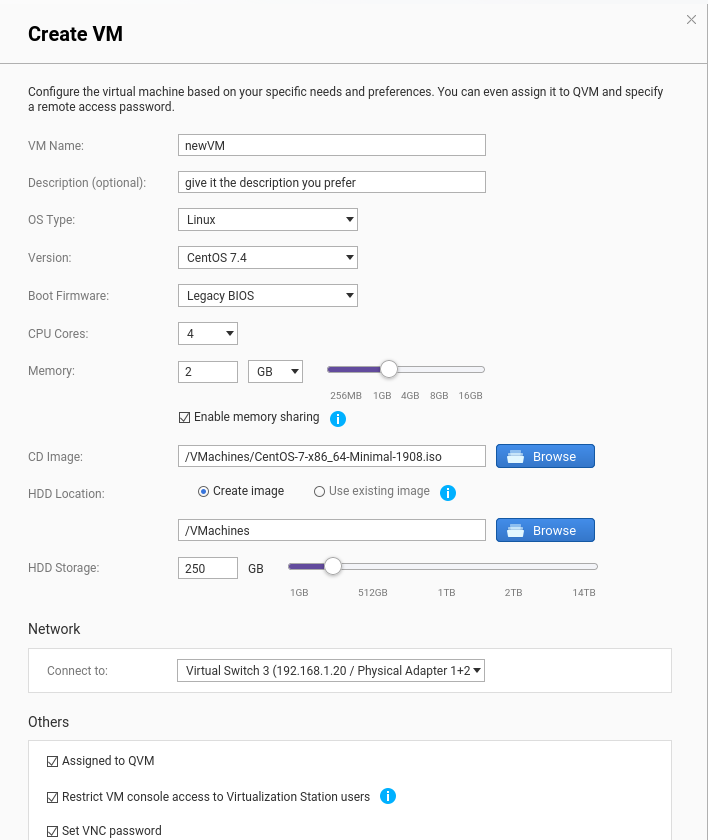
A note on the Virtual switches. There is a variety of possible uses of a virtual machine of this kind. You can use it to test some software before going in production or you may need to expose it on your LAN or even you may need to expose it to the WAN side of your network. QTS environment allows you to create as many virtual switches as you need to customize the topology of your network to best fir your needs.
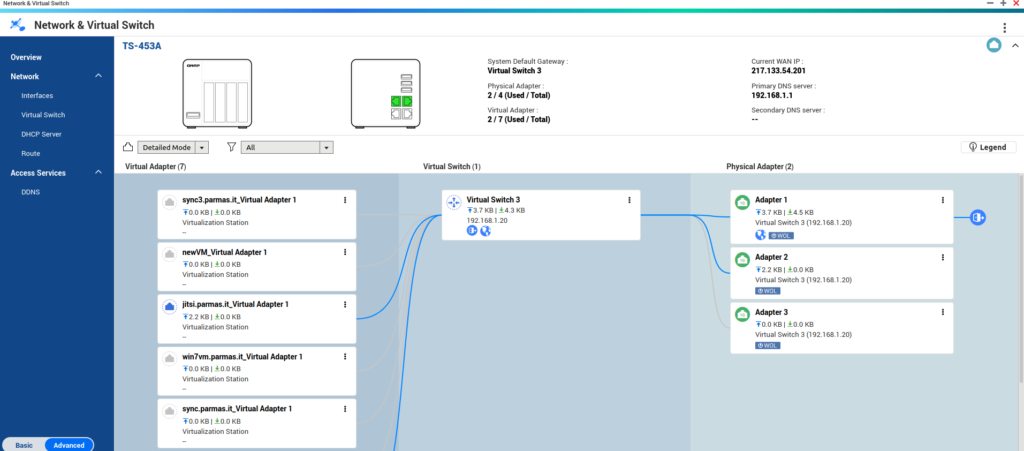
A virtual switch is practically the way that QNAP uses to create a link between your physical network interfaces on the NAS (the rj45 ports behind your QNAP case) to the interfaces of virtual machines.
Here under you can see how my setup works, at the moment I have only one virtual switch connecting one of the 4 rj45 connections of my NAS to all of my virtual machines installed in the system. In this particular case, my virtual switch is also reaching WAN side, so it is providing internet connection to all my machines.
Step 3
Customize the VM a little.
In the overview section of Virtualization station you can access the Settings page of each virtual machine. The screen looks like the ones here under.
Network section
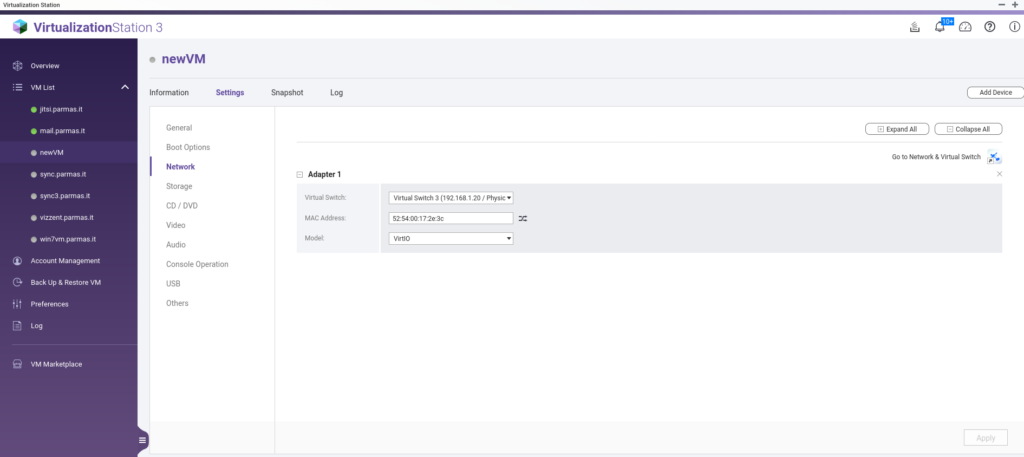
It is important that you take note of the MAC address you are giving to the virtual machine. In the best case you will have everything atumatically recognized by your router and other devices, but it you plan to give this machine a static ip in your LAN, you will likely need to assign a static routing in your home router, especially if you need to expose some TCP ports to the internet while you don’t plan to include this machine into your DMZ.
I don’t use DMZ in my house, I just expose only the necessary doors to the internet assigning a static routing (port forwarding) of each LAN port to a specific WAN port. Everything works perfectly as far as you don’t change the ip or the MAC address of your virtual machines.
Storage settings
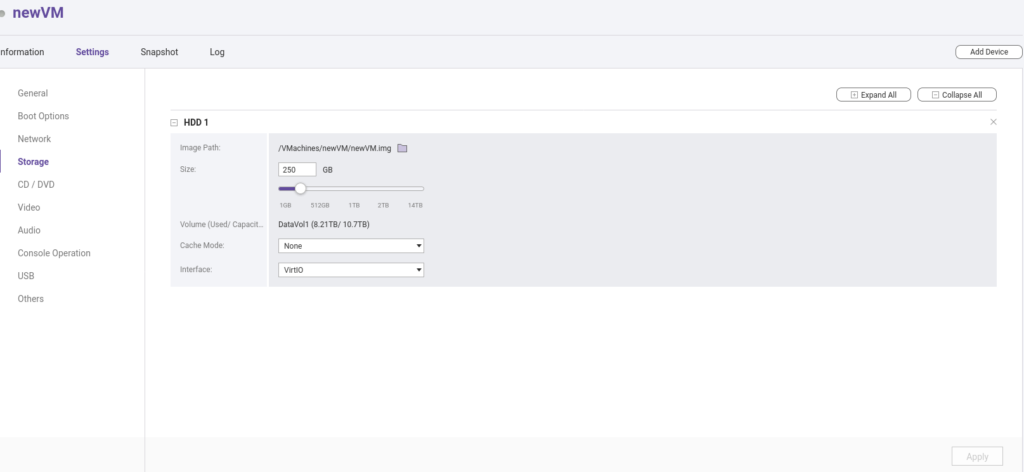
With regard to the topic related to storage, we could open a never ending discussion on what is the best method to exchange information between machines, because everybody definitively needs to exchange data.
This argument is also closely related to the backup strategy that you are intending to put in place. Given for granted that you have one in mind, you may prefer to separate your data from your core VM software (for example giving the home folder a separate hdd file, or let the /var/spool/ folder reside on a separate iSCSI target of you are intended to use Kolab mail server as supposed here above).
My strategy is the more straightforward: keeping things simple is the easiest way to save time later. So I put everything in one single disk and then mount other partitions as nfs or samba shares at boot time.
I am still considering that the intended usage of your virtual machine is somehow similar to the ones described in this website so that you are likely at home where you have full control of all your devices and somehow a limited environment to take care about. I would leave iSCSI targets apart if I were in your boots, but you may consider the advantage of using it if you have more than one NAS.
I think a note n caching is also needed. Virtualization station allows our virtual machine to make use of several writing methods to the virtual drive, cashing data comprised.
Cashing is a nice thing to speed up input output but it also has drawbacks so I normally turn caching off. The major cons are related to the possibility to have the virtual machine backing up old data if the cache is not fully flushed into the virtual drive first. So, if you need to have a precise idea of when your data is really on the disk better you turn this feature off as well.
Console operation settings
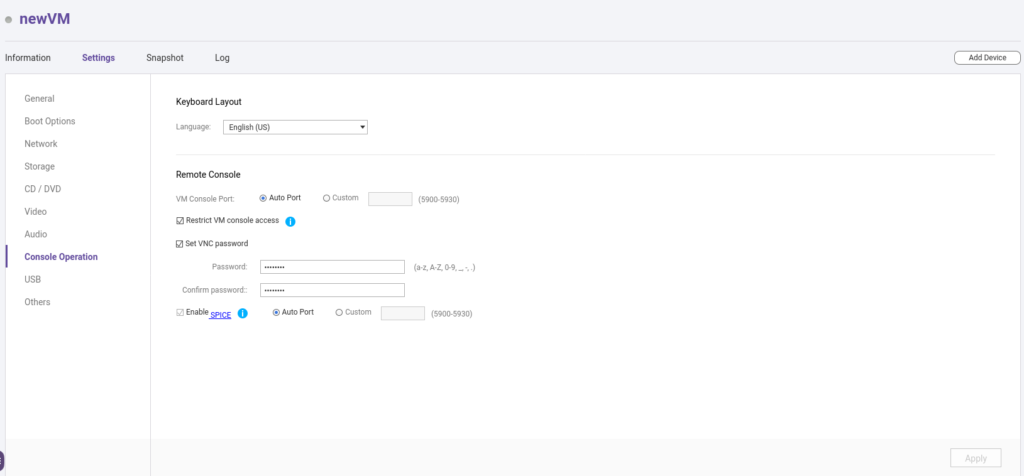
In Console operation section you will find some important options that cab create troubles if not correctly defined. For example the keyboard layout. This has to be equal to the one you will define during the installation of the OS you are intending to put on the virtual machine. I have experienced that having two different layouts in these two layers bring to mismatching mappings of non standard keyboards. I have never tried using a standard English keyboard, but for sure the french and Italian ones fail to be mapped in CentOS if you let this setting to simply English. Soo, be sure you pick the right one.
Here you can also define the VNC password to later connect to the remote desktop. If you know how to use SPICE you can also enable this feature as well, but I find ssh connections far more handy than using a client.
Make also sure not to restrict the VNC access after having set up its password (i.e. leave not flagged the option right above the password field).
There are also other settings that have quite straightforward meaning so there is little sense in entering into many details here. I just make a little note on the nice auto start function of Virtualization Station.
You can choose to have your VM to start automatically when you fire up your NAS (or when you reboot it). This is a good help when you plan to use the VM for a permanent service (like a mail server or a video chat service) with practically no disadvantages.
Step 4: install the OS
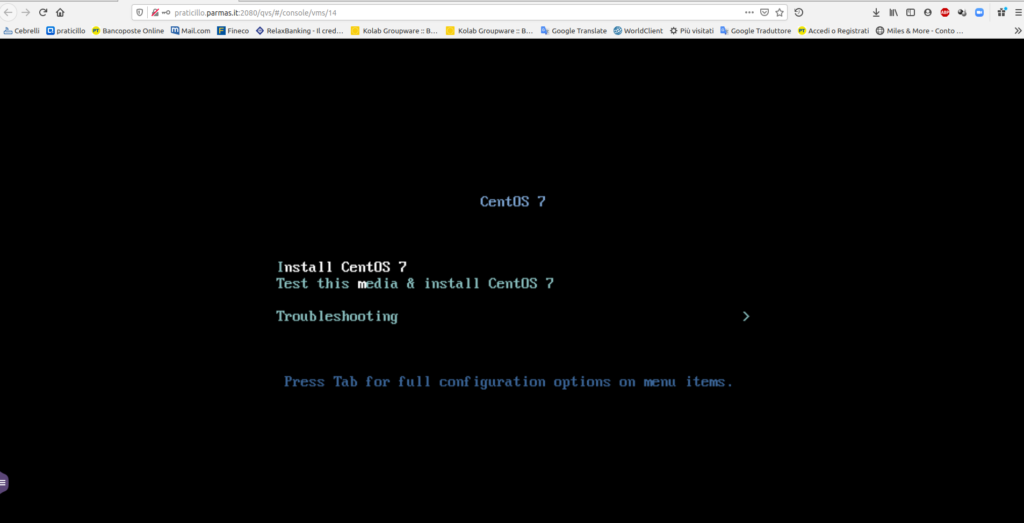
Boot up the VM and log into the remote console by clicking on the window showing your the preview of the VM screen. This will likely open a new tab in your browser asking you to type the password you set up for VNC connections.
The setup script of CentOS 7 will show up, shoose Install CentOS on your system.
The first choice you will have to make is about the language and the locale that the OS will use. Consider what I said before about the keyboard layout: here you have to use the same layout you have defined in Virtualization Station not to incur in silly problems with your keyboard.
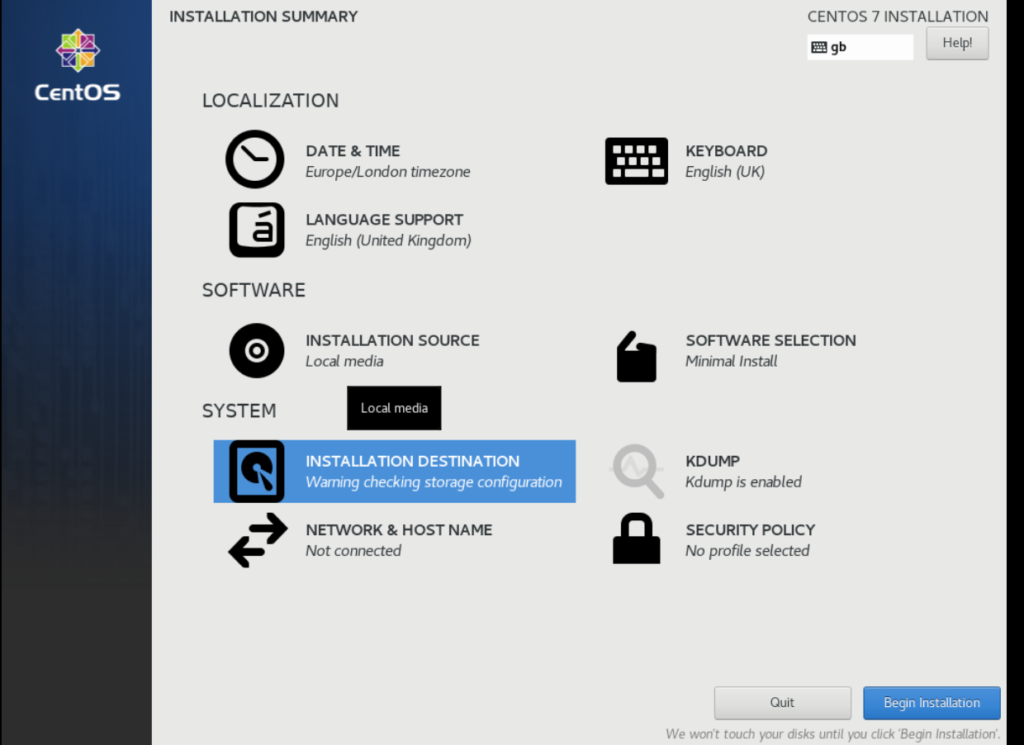
The you will be presented the main installation summary.
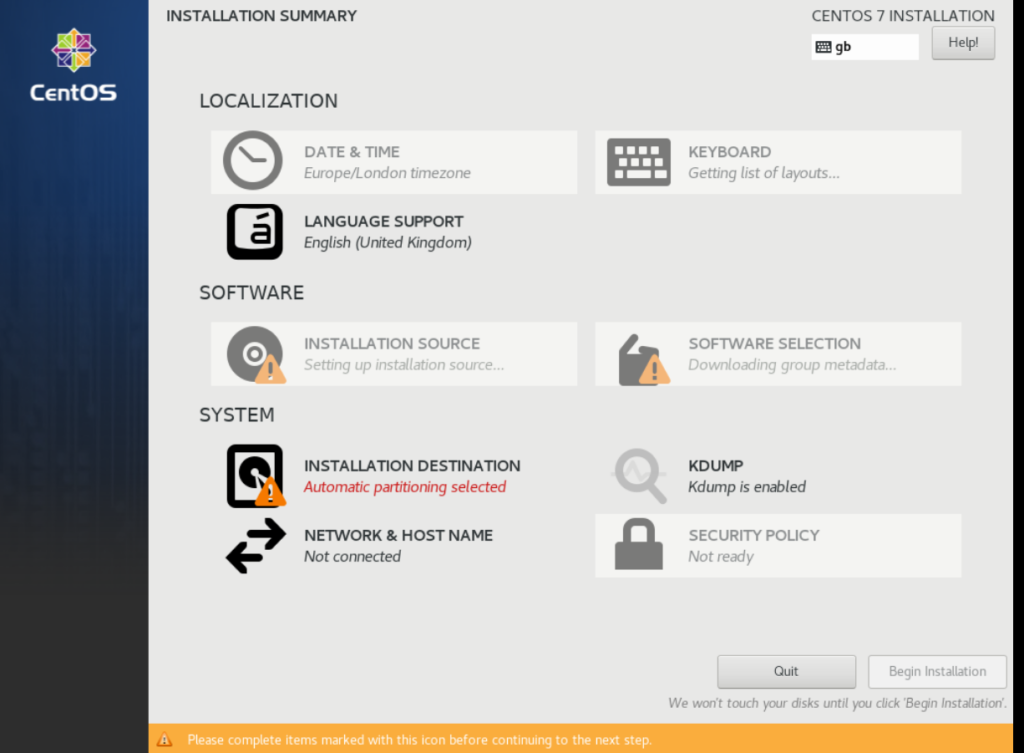
I generally turn KDUMP off and I leave no security police defined. Fell free to change these aspects if you have specific needs.
The installation summary contains three main sections you need to take care: Software selection, network settings and hard drives.
Step 5: Software selection
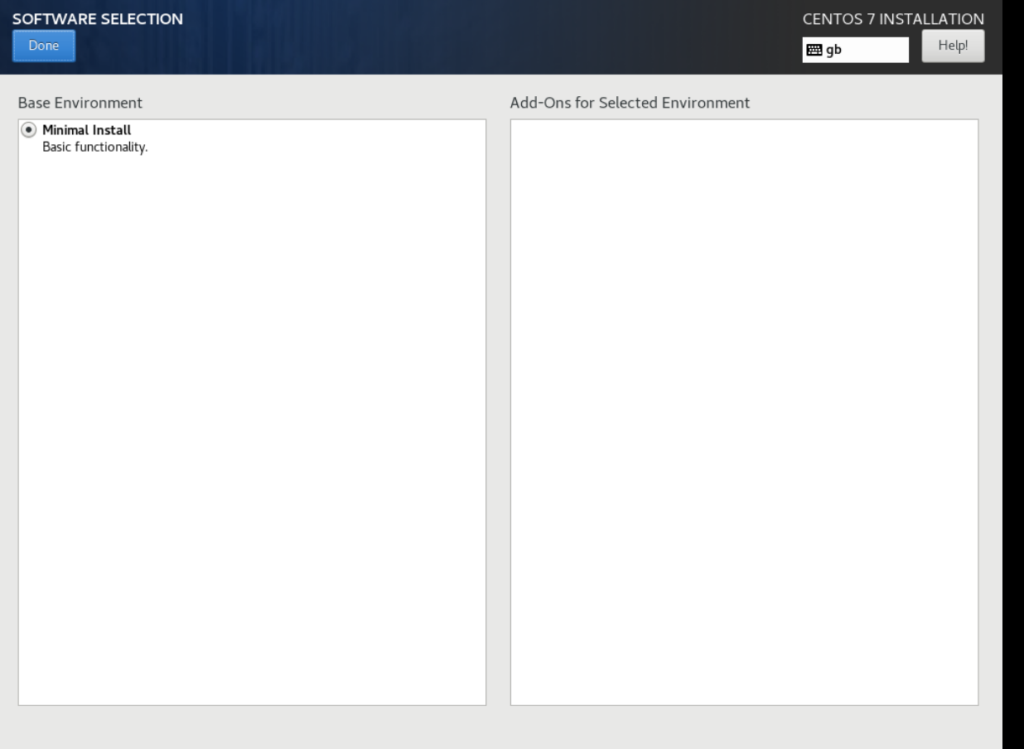
If you have downloaded the minimal iso install file, you will have only one option to choose here. IN case you downloaded the full DVD iso file, you will be presented to install a variety of software grouped by type, comprising also several desktop managers.
In my case, with the minimal install I will have no graphical environment at first run but we will be able to choose it later.
If you plan to use a graphical user interface consider that the minimum amount of RAM to give to the VM is 4 Gb.
Step 6: Hard Drives
If you decided to follow my advice before, you will be presented only one hard drive to partition.
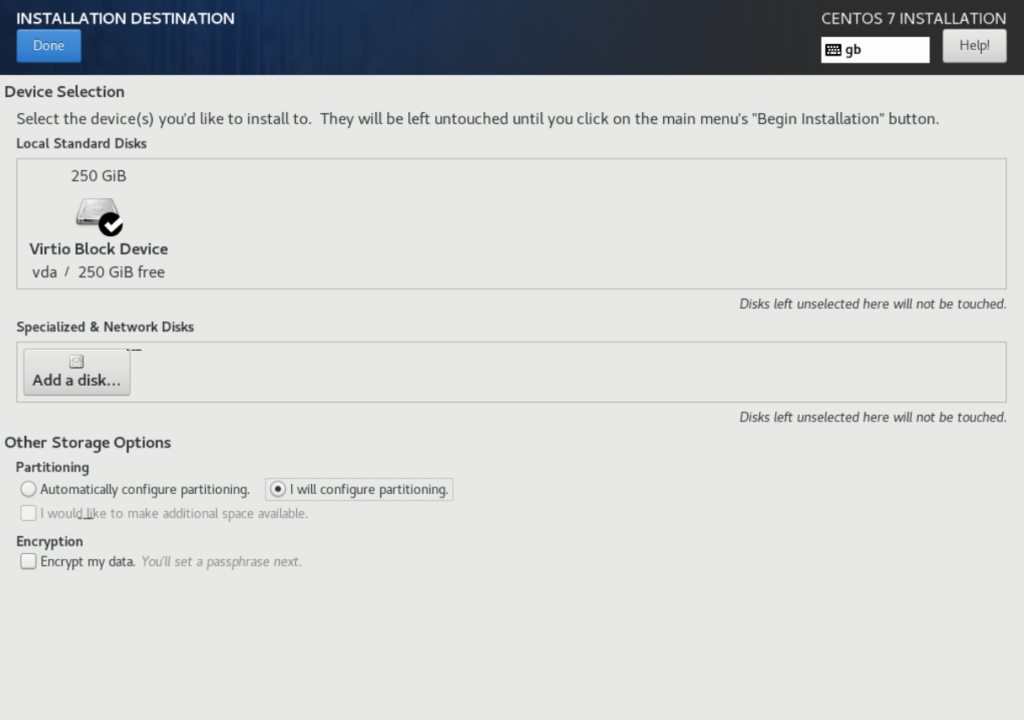
You can anyway add more disk in this section by clicking on Add Disk to include iSCSI targets or other nfs shares or additional partitions visible to the virtual machine (you normally need the network configuration described at Step 7 set up first to see external targets).
Partitioning correctly on a VM means really nothing in my opinion. The filesystem on which the whole thing resides is merely a file on another filesystem in turn, so I just keep things simple and give the whole virtual hard drive one only partition mounted as root.
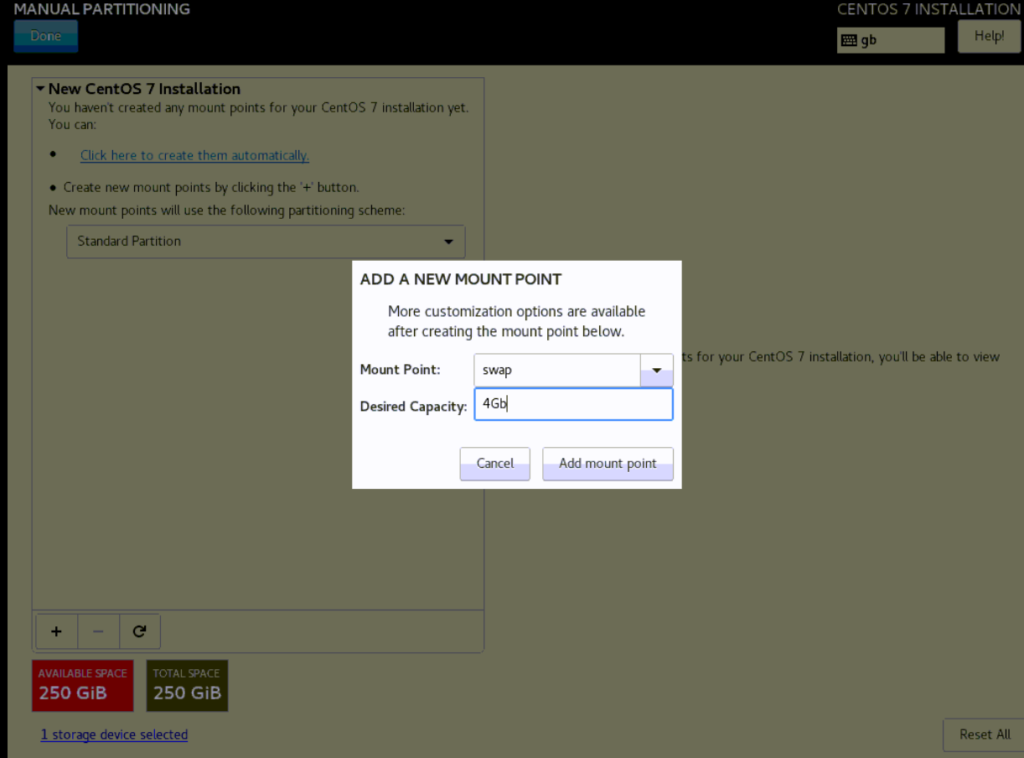
An important note on swap. If I am sure of what the VM will need in terms of RAM, I normally avoid creating a swap partition in order to avoid having to struggle with the swappiness of the operating system. It is good practice to create a swap partition anyway, so feel free to create first the swap sizing it equal to the RAM you have equipped the VM with and then use the remaining space for the root filesystem.
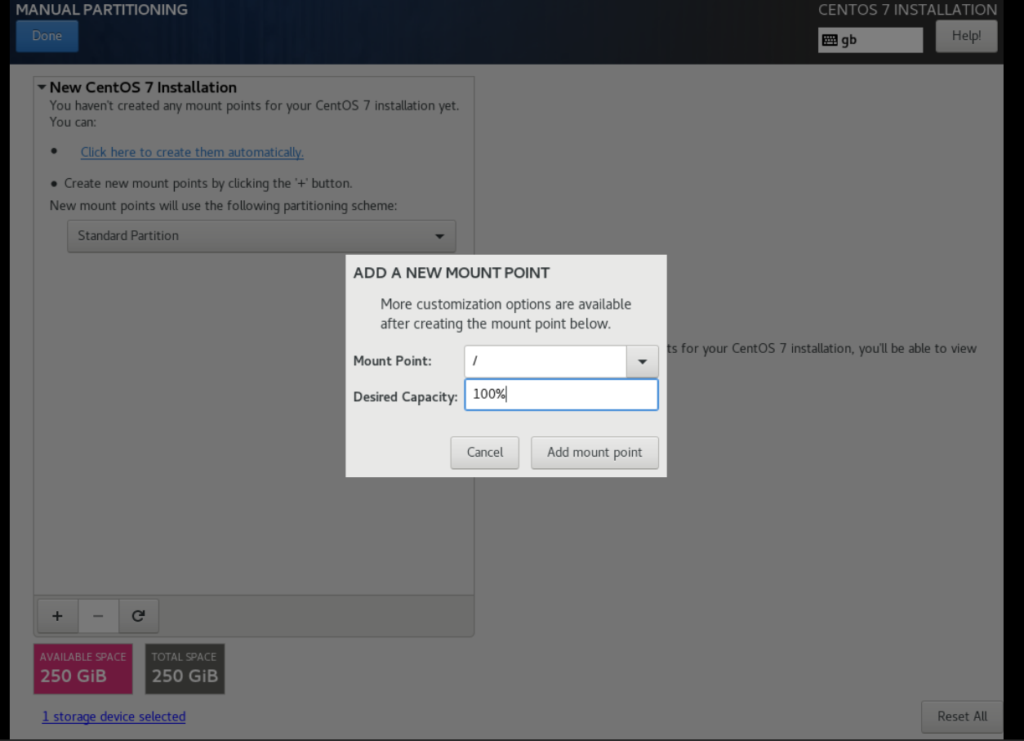
I normally pick ext4 format even if the xfs type is said to be the standard for centOS. Feel free to choose the one you are more familiar with. However you will not see any tangible performance difference when choosing a certain type of filesystem.
Also LVM is just another layer of complexity added on top of this sandwiched structure, so I generally opt of a standard partition. Note that the full dimension of the virtaul drive will not me allocated on the NAS as far that some data is not written into it. In this case we have choosen an hard drive of 250 Gb of maximum space, but after the installation of the minimal iso, the real file containing the image of our virtual machine will be just few gigabytes, it will grow over time up to his maximum extent defined to be 250 Gb.
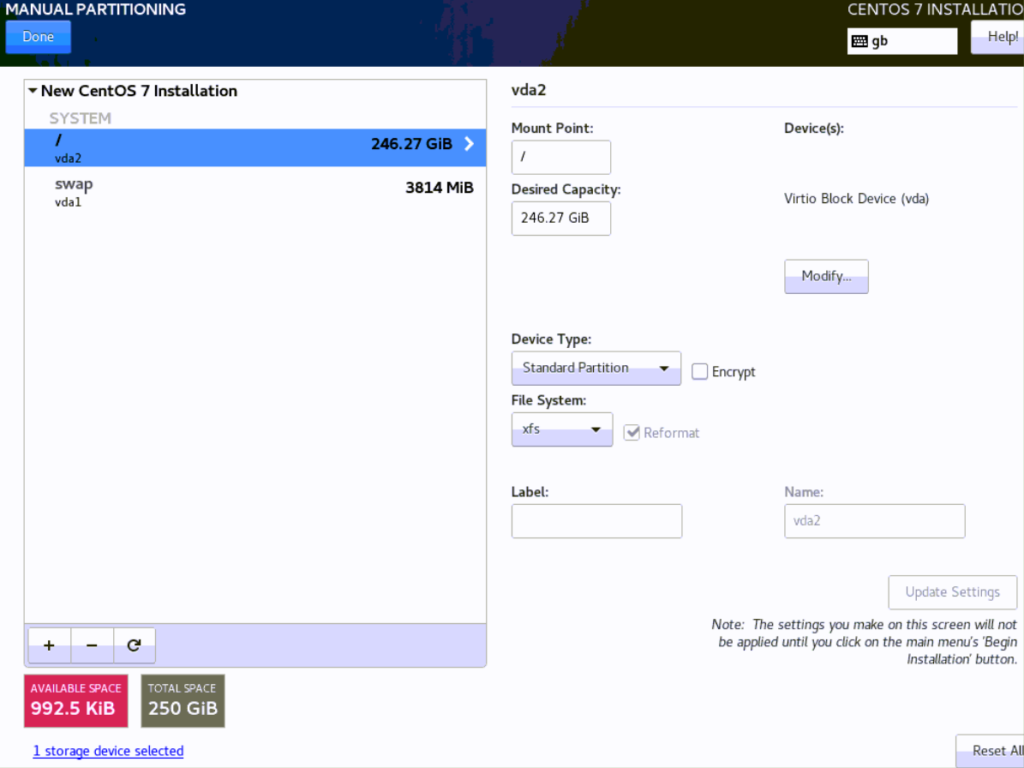
Give the partition a label too, and go.
Step 7: Network settings
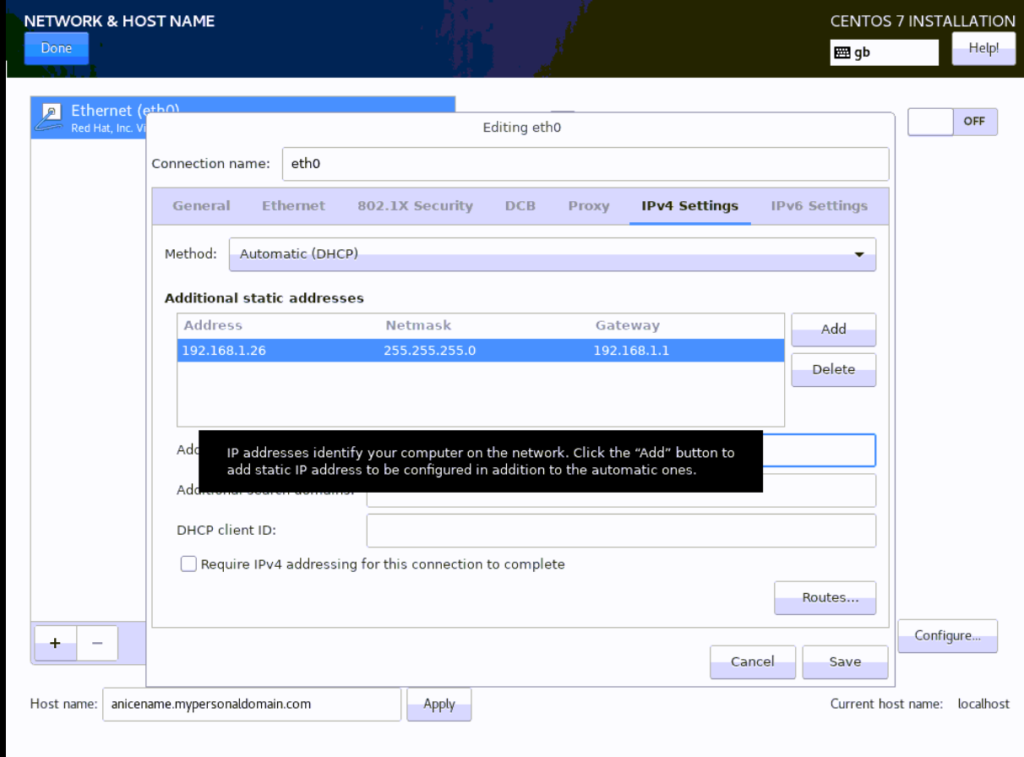
In this section you can define the machine name as seen by other units in your network and define also the ip that the operating system will be try to reserve for itself.
Generally, the modem/router at home serves as dhcp server. So, if you have created a static assignment coupling the MAC address you have noted previously to a precise ip number, the model will always grante that it to that virtual machine. This renders almost useless to define the exact ip address but I normally define it here as sometime I change the settings of the modem/router.
In case you are planning to use keepalived on this virtual machine, better you define its ip precisely since the beginning in this section.
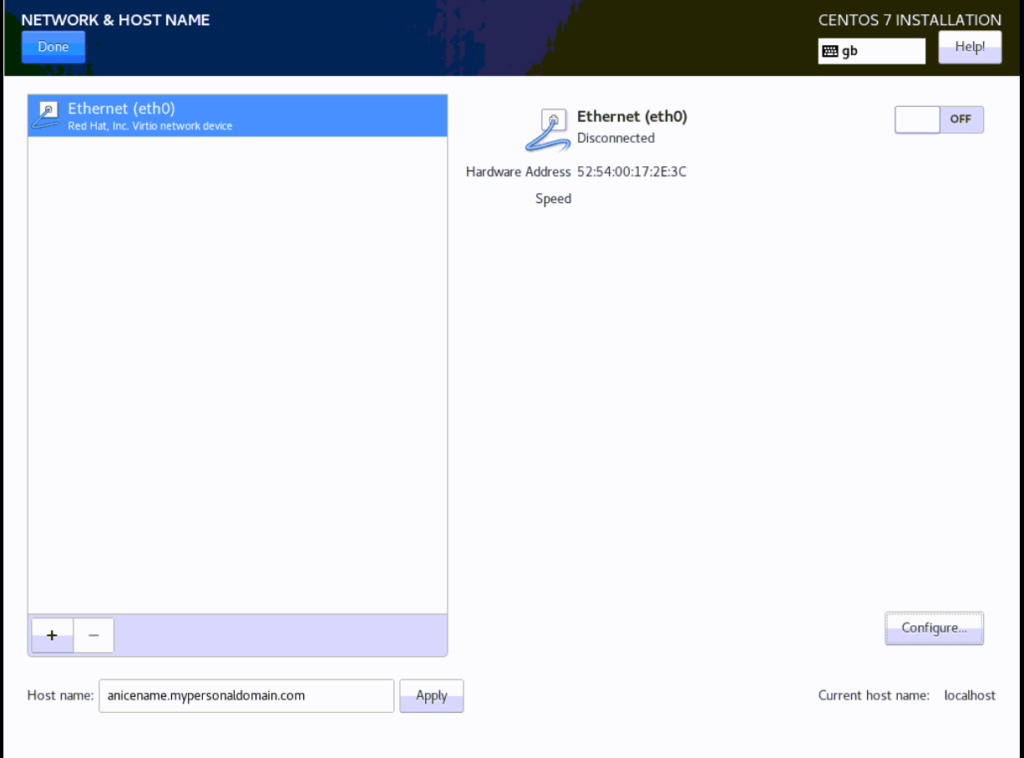
One important information you have to inserti is the machine name and domain to which the machine belongs to. It has to be inserted in the form machine_name.domain, where domain can contain dots as well (for example to include a final .com attribute).
In these section you can also define to activate this connection immediately at VM boot, define additional DNS servers and all the specific network configuration you may need.
I generally turn the ipv6 support off for my machines.
You can also decide to test this connection immediately during the setup. The installation screen will show your ip and connection status immediately.
Step 8: Complete and reboot
Then you can begin the real installation by pressing on the bottom right blue button.
After you start the installation, the selected software will be copied to the virtual drive (after the installation script will have created the required partitions obviously.
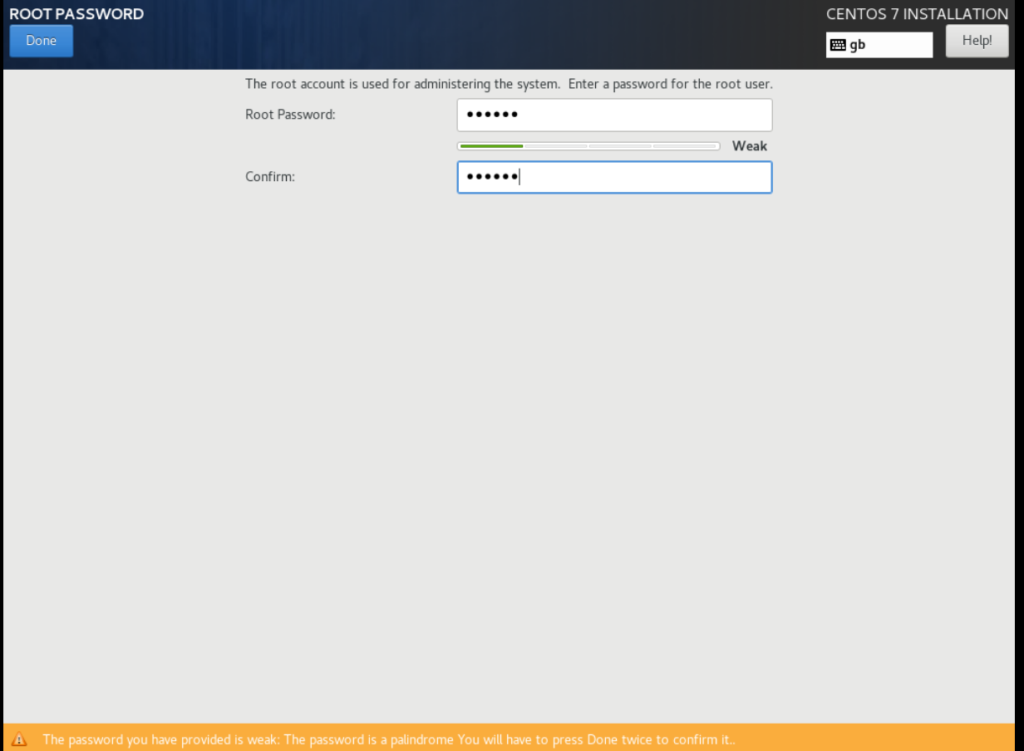
In the meantime you can define the root password and the users that will be allowed to access the machine.

Note that the requirements on the password strength have been elevated in the most recent versions of CentOS. You can anyway skip to comply by pressing the button Done twice to confirm you want to use a weaker password.
When the installation will be completed, you will be prompted to reboot the system.

At first startup you will be able to log in as the root user with the password you have choosen previously and make use of your new virtual server.
Hope you enjoyed the reading and I will be glad to read your comments as well. You can subscribe if you want to dig more into more details writing me a message.
Auf wiederloege
Alex
Hi,
When installing CentOS 8 what version should I select? I highest I have available is 7.4.
Thanks for the tutorial, very helpful.
Hi Dave,
it depends on the use you intend to do with that VM. If you need it for Kolab you must choose a 7 version, the subverison is irrelevant, you will bring it to the highest update at the first yum update run.
Se invece cerchi una macchina 8… la tua affermazione è insensata perchè l’immagine di 8 non contiene versioni 7.4 o superiori (attenzione che Centos8 non usa yum ma dnf)!
cheers
Alex